How to Join
Contents
Pack IPs & Versions
| IP¹ (Europe & Asia) | IP¹ (Everywhere Else) | Pack & Version | Minecraft Version | Notes |
| po3.moddedminecraft.club | po3-na.moddedminecraft.club | Project Ozone 3: Kappa (3.2.51) | 1.12.2 | none |
| fr.moddedminecraft.club | fr-na.moddedminecraft.club | FTB: Revelation (3.2.1) | 1.12.2 | none |
| atm3r.moddedminecraft.club | atm3r-na.moddedminecraft.club | All the Mods 3: Remix (1.5.4) | 1.12.2 | none |
| e2e.moddedminecaft.club | e2e-na.moddedminecraft.club | Enigmatica 2: Expert (1.76a) | 1.12.2 | none |
| of.moddedminecraft.club | of-na.moddedminecraft.club | Omnifactory (1.2.1) | 1.12.2 | Bug fixes have been applied on top of pack to tackle lag, no client update should be required. |
| gtnh.moddedminecraft.club | gtnh-na.moddedminecraft.club | Gregtech: New Horizons (2.0.8.3) | 1.7.10 | This pack is a legacy/Technic pack. See the Technic Pack section for details on how to install it. |
¹: We have 2 IPs for each of our servers to allow different methods of connection to the server. Both IPs for each pack point towards the same server, but will have less connection problems in their designated regions.
Twitch Packs Setup
Downloading the Twitch App
In order to get started, go to the Feed The Beast website and download the Twitch App or the FTB (Legacy) launcher.
Installing the Twitch App
Run the downloaded setup file, which will begin the installation process after you have accepted the EULA. The Client installer may have to update your .NET framework – it will do so automatically. The client may need to undergo an update when logging in for the first time. It will automatically restart and install the latest update for you. Shortcuts will place a Twitch shortcut on your desktop Please note that you will need a Twitch.com account in order to use the Twitch App. You can register for a free account on Twitch.tv or on the Client login page.
Using the Twitch App
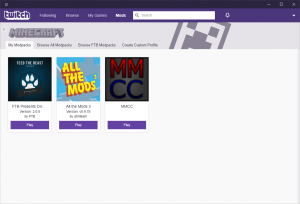
You can find an entire tutorial on how to download the desired modpack over at Twitch.tv
Technic Packs Setup
Getting the Launcher
Before using the Technic Launcher, you need to have Java 8 installed. MMCC officially recommends the AdoptOpenJdk builds, due to their superior license and availability to the official Oracle builds. Follow the instructions here for your platform to install OpenJDK 8 (select the Hotspot VM). Once Java is downloaded, the Technic Launcher is available on the Technic Platform website. It works on Linux, Mac, and Windows. To download it, simply go to the download URL, scroll down until you see buttons for Linux, Mac, and Windows, and then click the button for your platform. The file that you receive should be directly executable on your platform. Simply place it in a convenient spot for you. Once you launch it, you will be asked some questions such as for your Minecraft username and password and for where to install the Minecraft files to. Answer these questions as you see fit.
Finding, Installing, and Launching Packs
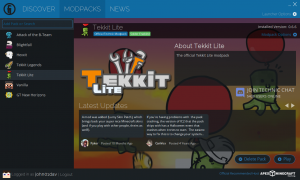
Once you have finished setting up the launcher, when you open it (unless you must log-in again, which sometimes happens) you'll see the main launcher. The Technic Launcher has 3 different screens: Discover, Modpacks, and News. For general usage, the Modpacks screen (pictured on the right) is the most interesting. To access this screen (pictured on the right) simply click on the "MODPACKS" text in the left of blue bar at the top of the launcher window.
Once you're there, some modpacks (e.g. Tekkit Lite) are instantly listed on the left. To play one of these packs, click on the pack to select it, and, once it is selected, click "Install" in the lower-right of the launcher. After the pack is installed, a "Play" button will appear where the "Install" button was previously. This button, as the name suggessts, launches the pack.
Some packs, however, are not official Technic packs and thus must be added manually. To do so, type a fragment of at least 3 characters of the pack's name in the text box labelled "Add Pack or Search" to find it. For example, to install GT New Horizons (its name in Technic), you may type "new," "horizon," or a variety of other things. Once you've searched for the pack, the left pack list will be replaced by the search results automatically (there is no need to press enter or click any button — just typing is sufficient). Just as before, you can select any result and then install it.
Tweaking Settings & Accessing Minecraft Folder
Many players of Technic packs will want to tweak settings. The settings in the Technic Launcher are divided into two categories: per-pack settings (including the pack's version and install folder) and launcher settings that apply to all packs (including Java arguments and memory allocation). To access per-pack settings, first select the modpack whose settings you want to change, and then click "Modpack Options" about 1/8th of the way down from the top of the window on the right, with a gear next to it. In the small window that appears when this button is clicked, it is possible to change the version of the pack, reinstall it, open its Minecraft folder, or move it. To access the launcher settings, click on the "Launcher Options" button with a gear at the right of the launcher at the bottom of the blue stripe at the top. This will bring up a helpful settings window with a large variety of options. The most interesting to you are likely in the "Java Settings" tab, however. It is worth briefly exploring these settings to determine if you want to change any.


